3.1 Create A Job Manually. Version 1.0. Last Updated June 2025
Creating a Job Manually
To create a new job, navigate to the ‘Jobs’ in the Contractor Workspace Menu. Click the 'New Job' button.
You can also use the quick access '+ New' option at the very top right of your screen and select ‘New Job’ from the drop-down menu.

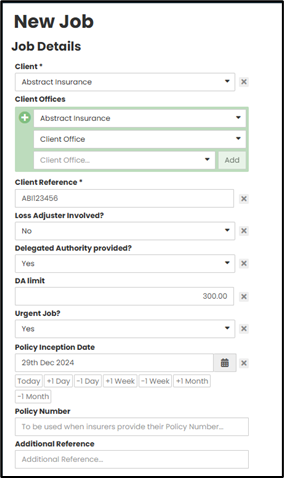
Complete the ‘Job Details’ section, then select ‘Next’. All items marked with an Asterix (*) are mandatory fields that must be completed to continue.
Note - The Client is the party who is sending you the job request, for example an insurance company, loss adjuster or claims management business
Next, complete the Instructions section, once done select the Next button at the bottom of the scree. All Asterix (*) items are mandatory fields
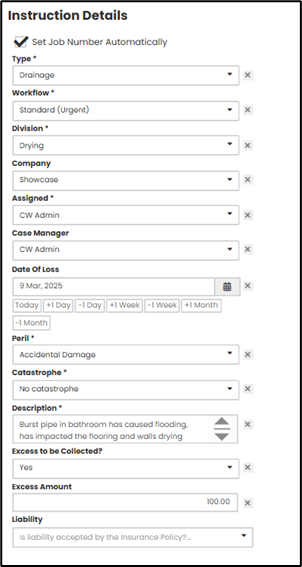
Note - the question type and layout may vary depending on your company set up
Next, complete the Instructions section, once done select the 'Customer/Property Details' page. The ‘Customer’ is referring to the Insured or the Owner of the property where the repairs are taking place.
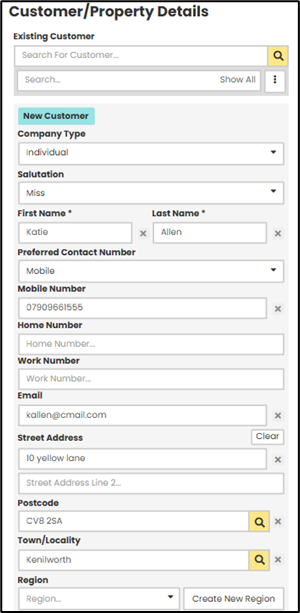
You can use the 'Search Existing Customers' section to select an existing Customer, who may already be in the database. Once customer has been found and selected this will automatically prefill the Customer information.

Further down the job page, you will see ‘New Contact’ option.
If there is an additional contact to be added to the job, you can enter their details here.
There is also an option to 'Tag' a Vulnerable customer if required.

Click the ‘Register’ button at the bottom of the screen to create the new job.

 Before you view the job you just created, you have the option to 'Add Documents.'
You can use this function to upload any Client request you have received externally, or other items such as photos provided by the Policy holder.
Note - you can upload documents to the job at any point in time
 From here you can use the buttons at the bottom of the screen to either 'View Job' you have just created or 'Add Another Job' and go back to create a new job.

Was this article helpful?
That’s Great!
Thank you for your feedback
Sorry! We couldn't be helpful
Thank you for your feedback
Feedback sent
We appreciate your effort and will try to fix the article