9.1 Creating Estimates Manually. Version 1.0. Last updated July 2025
Estimates
An estimate is a detailed breakdown of all required work within a job. You can have multiple estimates within the same job if required. Create an estimate manually following the below steps so you can send it to a client for approval.
Note: The Job must have been created in Contractor Workspace before you can create an Estimate. Please refer to Quick Reference Guide - Create a Job
Creating Estimates
 From the main menu select Jobs.
 Locate the job you want to create the estimate for and click to open.
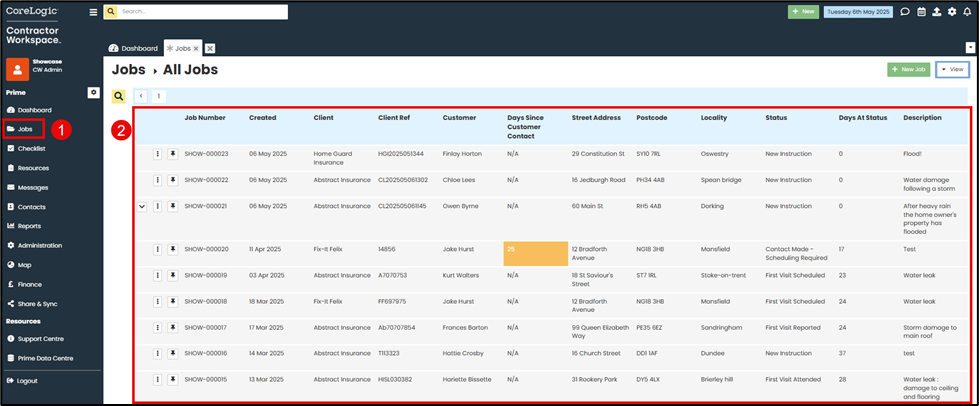
 Within the Job, click the Estimates option in the job menu on the left-hand side of the screen.
 Click the Create New Estimate button at the top of the page.

Estimates can be created from an estimate template. These are available in the drop-down menu at the top of the page. If this drop down is not available it means you do not have any current estimate templates created

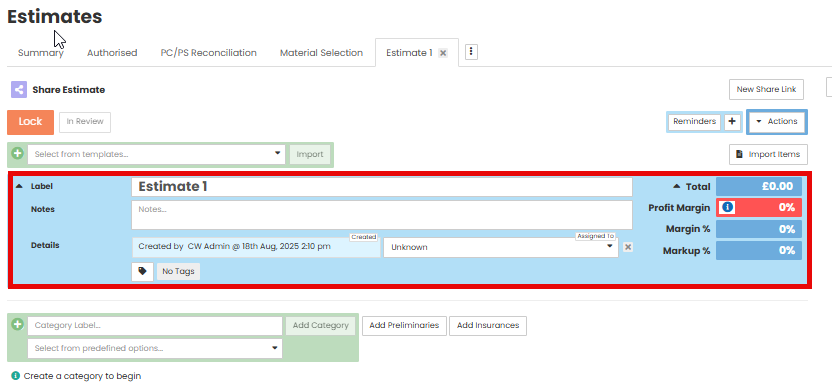
Creating Estimates Manually
Apply the details in the top blue box as required, this includes the Label, Notes and Assigned To (Internal User).
Each estimate that is created in a job will have a label ‘Estimate’. You can change the label of the estimate as required
 Type the category label into the field under the estimate details

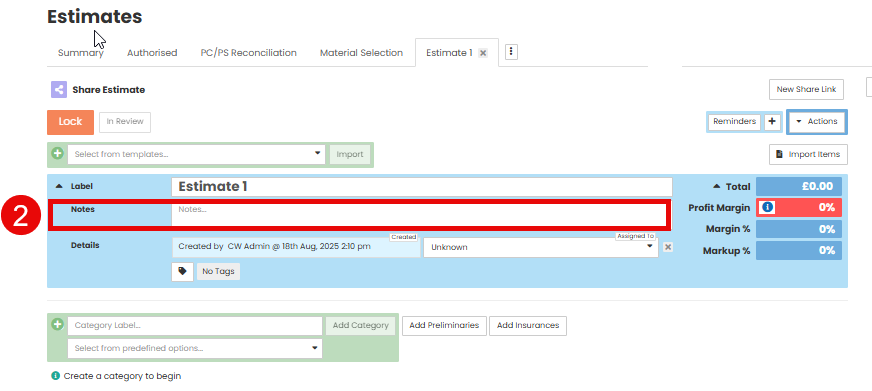
 You may add additional notes to the estimate, these are only visible internally
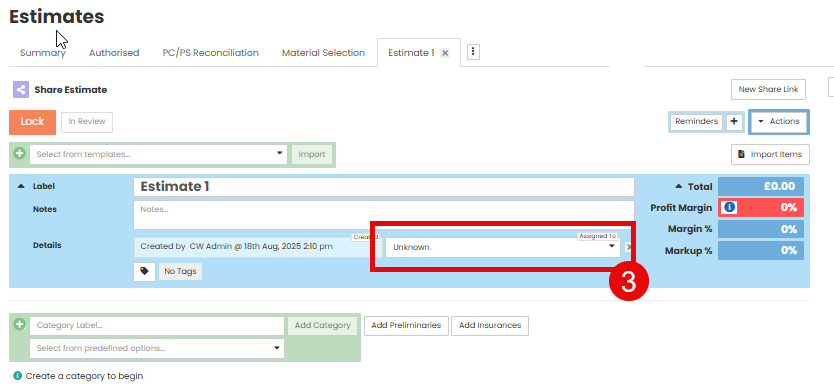
 As you are creating the estimate, it will automatically be assigned to you. You may assign the estimate to another internal user
Every estimate requires a category label. You may have multiple categories within the estimate. You can use ‘free text’ in the category label, or you can select a category from pre-defined options in the drop-down menu.
Note: The Category is usually the room or area in the property the repairs are taking place. However these can be pre-created in Admin settings
 Enter the category label into the field under the estimate details. Click Add Category
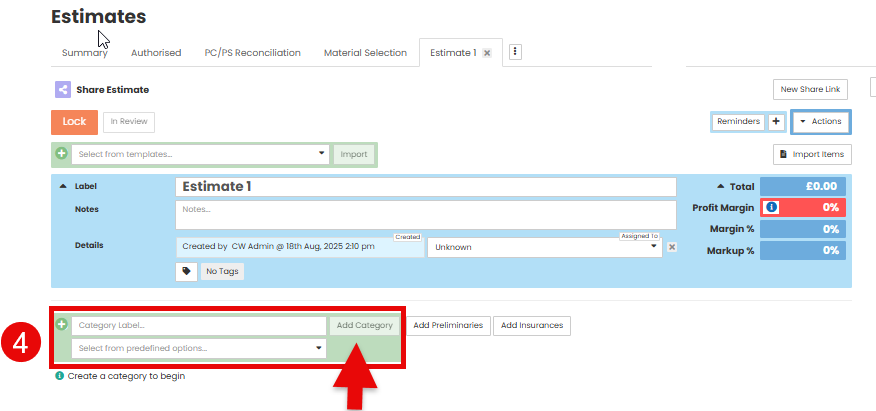
The new category will appear below.

To add additional categories repeat the above step.

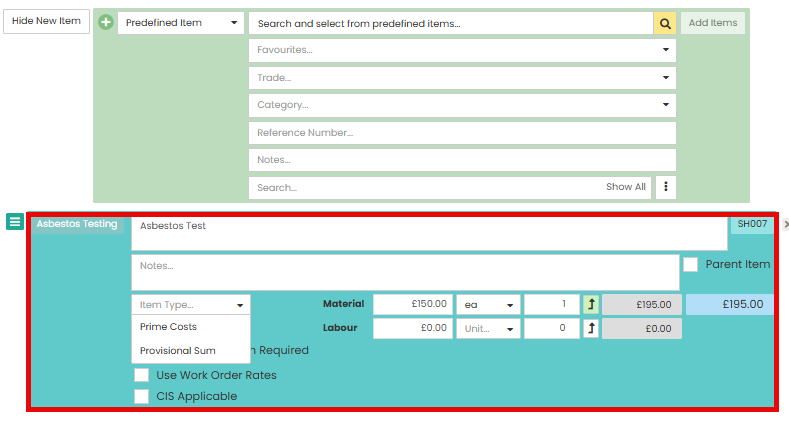
 Click the New Item button under the category heading. This will show a plus field to begin adding your line items into the category


- New Item – Generally used for infrequent or bespoke items that you have not previously added to a pre-defined item list. This option will enable you to manually create a line item
- Predefined Item – Predefined Items can be added into Prime through Administration to then be utilised on your estimates in jobs, this creates a library of items you can pull into the estimate rather than creating them from scratch each time you need it. You can also have rates saved against the Predefined Item.
- Recipe – will allow you to add multiple predefined items that have been grouped together into a recipe

Add New Item to Estimate
Use the New Item option in the first drop down to manually create your line item.

Select the Trade from the second drop down.
Note: Trades can be pre-defined in Admin settings
Type the detail of the line item into the description field. Click Add Item on the right-hand side

The line item will appear under the category heading.

Add the Material and Labour rates in the fields, adjust the unit using the drop down and add the quantity.
Use the Item Type drop down to tag line items as a Prime Cost or Provisional Sum.
Note: This will allow you to use the PC/PS reconciliation function after the Estimate has been authorised
Tick the VAT Free box if you DO NOT want VAT added to the line item.
Note: This will allow you to use the PC/PS reconciliation function after the Estimate has been authorised
A green tick will appear on the right-hand side when any changes are saved successfully.
Add Predefined Item to Estimate
Use the Predefined Item option in the first drop down to manually create your line item.
Show all will display the list of all predefined items.
You may filter you search using trades, categories etc.

Select the required items from the predefined list. Selected items will display a √ and will show in the field at the top.
Once all required predefined items have been selected, click Add Items.

The line item will appear under the category heading.
Add additional Material and Labour rates in the fields if applicable, adjust the unit using the drop down and add the quantity.
Use the Item Type drop down to tag line items as a Prime Cost or Provisional Sum.
Note: This will allow you to use the PC/PS reconciliation function after the Estimate has been authorised
Tick the VAT Free box if you DO NOT want VAT added to the line item.
Note: This will allow you to use the PC/PS reconciliation function after the Estimate has been authorised
A green tick will appear on the right-hand side when any changes are saved successfully.
Add Recipe Items to Estimate
A Recipe is a group of Predefined Items. They can be created through Administration and used in jobs when building your Estimates. When a recipe is selected all of the line items in the recipe pull into the category at once, so this is a great time saver.
Use the Recipe Item option in the first drop down to create your line items.
‘Show all’ will display the list of all recipes available. Or use the search field to type the name of the recipe you want to use.

Select the required recipe from the list. Selected items will display a √ and will show in the field at the top.

Once required recipe has been selected, click Add Recipe.
All of the line items in the recipe will appear in the category.

Edit the line items as required adjusting material, labour, quantities etc where applicable.
Use the Item Type drop down to tag line items as a Prime Cost or Provisional Sum.
Note: This will allow you to use the PC/PS reconciliation function after the Estimate has been authorised
Tick the VAT Free box if you DO NOT want VAT added to the line item.
Note: This will allow you to use the PC/PS reconciliation function after the Estimate has been authorised
A green tick will appear on the right-hand side when any changes are saved successfully.
Use the X to delete items not needed. This will display an ‘Are you sure’ pop up

Once all items have been successfully added to the estimate, select Lock.

Then ‘Select An Action’ from the following options
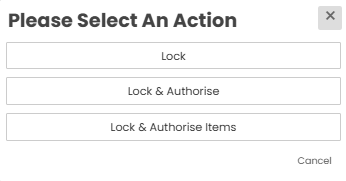
- Lock - This will lock this estimate pending authorisation. Any further changes will require this estimate to be either copied as a new estimate if rejected, or created as a variation if authorised.
- Lock & Authorise - This will lock and authorise this estimate - items will be left unauthorised. Any further changes will require this estimate to be either copied as a new estimate if rejected or created as a variation if authorised
- Lock & Authorise items - This will lock and authorise this estimate - all items will also be authorised. Any further changes will require this estimate to be either copied as a new estimate if rejected or created as a variation if authorised.
Lock
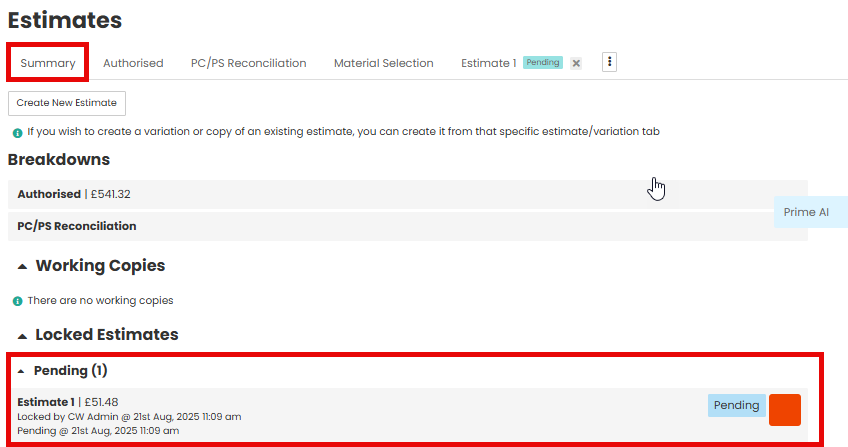
If you have selected Lock, this will lock the estimate pending authorisation. The estimate outcome will change to Pending. You can return to the estimate once authorisation has been received to authorise the estimate items.


When you navigate back to the Summary tab of the Estimates you will see the estimate has now moved under the Pending sub heading.
Once authorisation has been received, return to the estimate within the required Job. In the top left hand corner click the button that says Authorise. The pop up box 'Change Estimate Outcome' will appear, you can add a Note in the text field and then click Change Outcome.

You may now follow the steps below to either authorise ‘all’ items, or select individual estimate items for authorisation.
Lock & Authorise all Estimate items
If you have selected Lock & Authorise the estimate outcome will change to Authorised. You now need to select the items within the schedule. To select all line items within the estimate click Select all and click the button that says Update Authorisation for XX Items.

You will see a pop up box appear saying 'Authorisation Updated', click the OK button.

The estimate has now been authorised, when you scroll down the screen you will see all the line items highlighted green with a tick on the right hand side.

When you navigate back to the Summary tab of the Estimates you will see the authorised estimate has now moved under the Authorised sub heading.

Lock & Authorise Individual Estimate items
To select individual line items within the estimate select the required line item to display a tick, and the line item(s) will appear in green. Scroll to the top of the section and select Update Authorisations for XX items.

A pop up will appear to confirm the item status was updated successfully.

Was this article helpful?
That’s Great!
Thank you for your feedback
Sorry! We couldn't be helpful
Thank you for your feedback
Feedback sent
We appreciate your effort and will try to fix the article