22.39How to Use Workflow Actions. Version 1.0. Last updated October 2025
Workflow Actions Overview
Workflow Actions allow management/administrators to restrict users from changing statuses if certain actions have not yet been completed.
The benefit of this is to ensure adherence to business process and compliance and ultimately leads to improved data integrity for every job/claim.
By incorporating this feature into your Contractor Workspace instance, this will highlight to your staff what activities are still outstanding so that these can be attended to promptly and the job/claim can progress.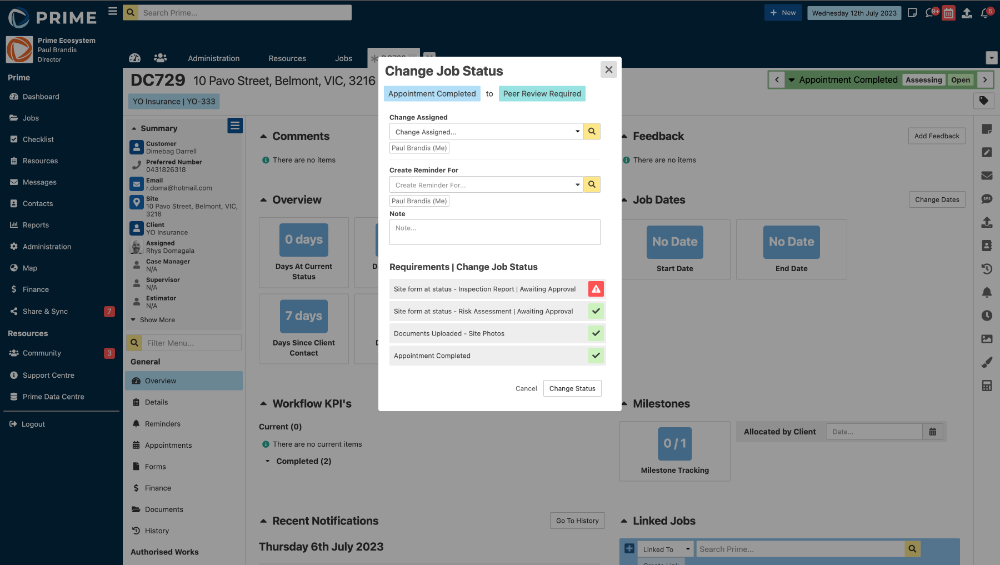
- Allows management to restrict users from changing statuses of Jobs, Appointments, Work Orders, Allocations if certain actions haven't been completed on the job first
- Providers the users with a list of the actions that they need to do based on where the job is up to in the Workflow
- Can be used to improve data integrity by not allowing jobs to be closed until all job attributes are ticked off - Appointments, Reminders, Work Orders, Invoices, Allocations
- Fully customisable and workflow specific, allowing the business to set Actions that are relevant for their business, or specific divisions/business units, or for specific clients
How To Use Workflow Actions
Workflow actions are items that can be added to a workflow, to set certain requirements, in order for an action to be taken on the workflow ie an appointment must be booked before the job status can be changed to Appointment Booked.
- Go to Administration
- Under Jobs, click on Workflows
- Go to the Actions tab
- Click Create New Action

- Label the Action (this should describe the action being performed)
- Select the Action Type that is being performed on the job. The Action is the step you want to restrict being done if particular parameters (requirements) have not been met.
- Set the Action to Active
- Save

- Click back into your Action to set the Requirement.
- Click Add
- Click Save

- The action now needs to be added to the workflow to apply to jobs. Click onto the Workflows tab.
- Select the workflow you wish to apply it to

- Scroll down to the Actions section and click Add Action

- Select the status you want your action to apply to. You can also have the action apply globally to all statuses.
- Select the Action you have created.
- Click Save

- Scroll back up and save the workflow

- From a job, when trying to change the status to Appointment Done, there is now a warning that displays if the requirement has not been met.

- Attempting to save the status change will throw an error. Note that this will also apply to automated workflow events. If the action is automated, but the requirement is not met, the automated event will not trigger.

- Complete the requirement of the action, in this case an appointment completed

- Attempt the action again. This time, you will get a green tick to indicate the requirement has been met

Using the Warning Only Feature
It is possible to have only a warning for the action. This will simply display a message to alert the user to the requirement not having been met. It will not prevent the action from being carried out.
- Return to the action created and click the warning only box
- Click Save

- A yellow caution symbol will appear to warn the user the requirement has not been met

Was this article helpful?
That’s Great!
Thank you for your feedback
Sorry! We couldn't be helpful
Thank you for your feedback
Feedback sent
We appreciate your effort and will try to fix the article